Lessons Learned: Jupyter Notebooks in MkDocs
This section documents lessons learned while converting the original v2 of this bootcamp (as of December 2025 where you had to download the files to interact with the lessons) to a mkdocs site that could integrate Jupyter notebooks & have people interactively utilize the files in their browser.
Quick Summary
- You need to have a markdown file that creates a wrapper to show a particular Jupyter notebook.

JupyterLite can be configured different ways:
- Files might be in the root working directory
- Files might be in a
/files/subdirectory - The path parameter might need URL encoding
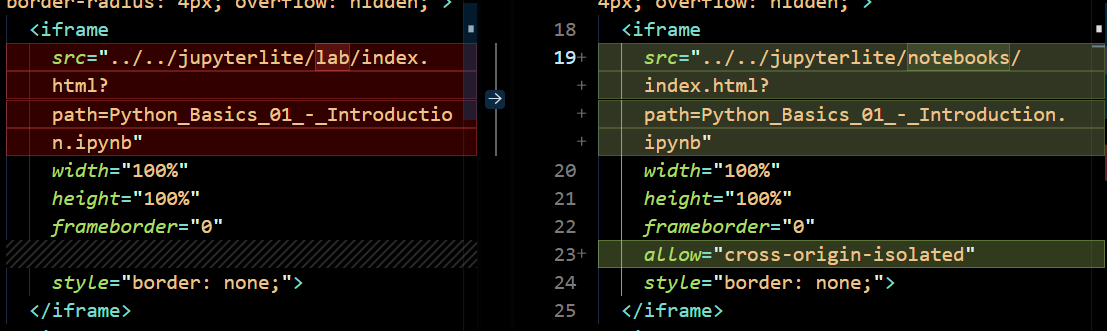
- Different interfaces (lab vs notebooks) might handle paths differently
Had to hide certain things in CI file so it didn't try to run tests against things it shouldn't be.
when using strict forced to address an incorrect item in my nav bar ... when fixed is cut the built time by ~50% (10+ sec)
The Core Challenge
When trying to integrate interactive Jupyter notebooks into MkDocs while maintaining the MkDocs navigation sidebar, you face a fundamental architectural challenge:
JupyterLite is a complete web application with its own navigation, menu bars, file browser, and interface. When you embed it in an iframe within MkDocs, you're embedding the entire application, which creates a "nested" appearance (MkDocs navigation + JupyterLite navigation).
Available Approaches
Approach 1: Embed JupyterLite in iframes ⚠️
How it works: Create markdown pages with iframes that load JupyterLite with specific notebooks.
Pros:
- MkDocs navigation remains visible
- Notebooks are interactive
- Users stay within your documentation site
Cons:
- Creates "nested" interface (two navigation systems visible)
- Path configuration can be tricky (404 errors)
- iframe limitations (security, sizing, scrolling)
- JupyterLite's full interface might be too cluttered
Example:
<iframe
  src="../../jupyterlite/notebooks/index.html?path=Python_Basics_01.ipynb"
  width="100%"
  height="800px">
</iframe>
Approach 2: Direct Links to JupyterLite ✅ Recommended for Interactive
How it works: Link directly to JupyterLite, opening it in the same tab or a new tab.
Pros:
- Clean interface (no nesting)
- Full JupyterLite functionality
- No iframe limitations
- Easier path management
Cons:
- Users leave the MkDocs site
- MkDocs navigation not visible in JupyterLite
- Need to navigate back manually (or use browser back button)
Example:
**Interactive Lessons**:
1. <a href="../jupyterlite/lab/index.html?path=Python_Basics_01.ipynb" target="_blank" rel="noopener noreferrer">Introduction</a>
2. <a href="../jupyterlite/lab/index.html?path=Python_Basics_02.ipynb" target="_blank" rel="noopener noreferrer">Syntax & Basics</a>
Using HTML anchor tags with target="_blank", links open in a new tab, making it easy to switch back to documentation.
Approach 3: Static Rendering with mkdocs-jupyter ✅ Good for Read-Only
How it works: Use the mkdocs-jupyter plugin to render notebooks as static HTML pages within MkDocs.
Pros:
- Perfect MkDocs integration with navigation
- Fast page loads
- No "nested" interface issues
- SEO-friendly (static HTML)
Cons:
- Not interactive - users can't run code
- Notebooks are read-only
- Need
mkdocs-jupyterplugin
Setup:
-
Add to
pyproject.toml: -
Enable in
mkdocs.yml: -
Add notebooks to navigation:
Approach 4: Hybrid Approach ✅ Best of Both Worlds
How it works: Combine static rendering (for reading) with links to interactive version (for coding).
Pros:
- Beautiful static display with MkDocs navigation
- Option to open interactive version when needed
- Best user experience
Cons:
- Requires both
mkdocs-jupyterandmkdocs-jupyterlite - Slightly more complex setup
Example:
# Introduction to Python
<!-- Static rendered notebook appears here automatically -->
---
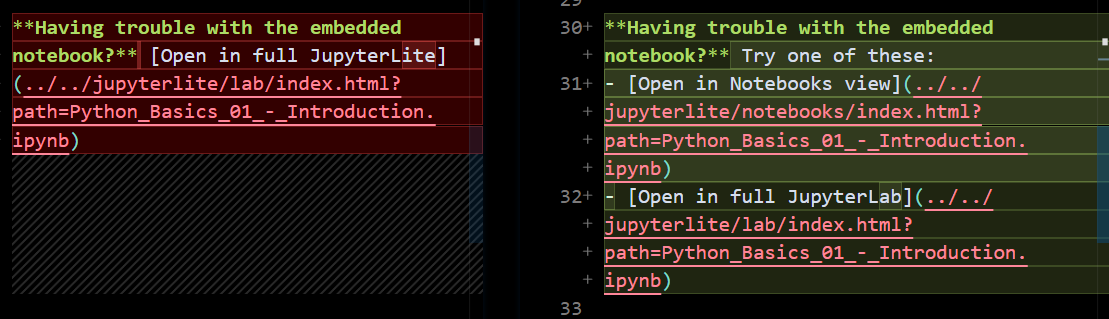
**Want to run this code interactively?**
<a href="../jupyterlite/lab/index.html?path=Python_Basics_01.ipynb" target="_blank" rel="noopener noreferrer">Open in JupyterLite</a>
Comparison Table
| Approach | Interactive | MkDocs Nav | Clean UI | Setup Complexity |
|---|---|---|---|---|
| Embedded iframe | ✅ Yes | ✅ Yes | ❌ Nested | 🟡 Medium |
| Direct links | ✅ Yes | ❌ No | ✅ Clean | 🟢 Easy |
| Static rendering | ❌ No | ✅ Yes | ✅ Clean | 🟢 Easy |
| Hybrid | ✅ Yes | ✅ Yes | ✅ Clean | 🟡 Medium |
Recommendations by Use Case
For Learning/Training Sites (Like This Boot Camp)
Use: Hybrid Approach (#4) or Direct Links (#2)
- Display notebooks statically for reading OR link directly
- Provide JupyterLite links for hands-on practice
- Best learning experience
For Documentation Sites
Use: Static Rendering (#3)
- Focus on displaying examples
- Code execution not critical
For Interactive Coding Tutorials
Use: Direct Links (#2)
- Full JupyterLite experience
- Open in new tabs
- Simple and effective
Fixing the 404 Error
If you're getting 404 errors when trying to load notebooks, check:
1. Notebook Path in JupyterLite
Notebooks are copied to docs/jupyterlite/files/ during build. Check if your notebook is there:
2. URL Path Parameter
The path parameter should reference just the notebook filename:
✅ Correct:
❌ Incorrect:
../jupyterlite/lab/index.html?path=/files/Python_Basics_01.ipynb
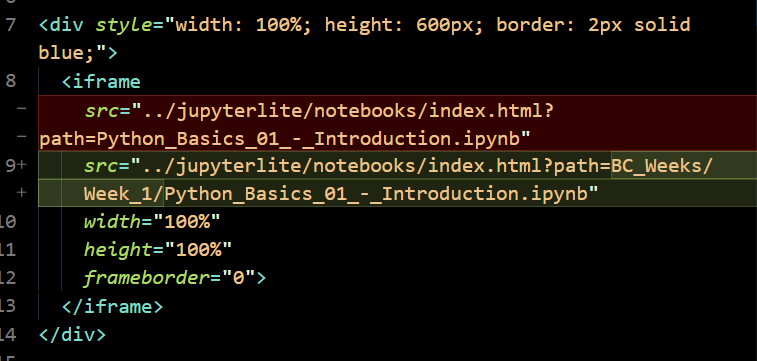
../jupyterlite/lab/index.html?path=BC_Weeks/Week_1/Python_Basics_01.ipynb
3. Relative Path from Your Markdown File
If your markdown is at docs/BC_Weeks/Week_1/lesson.md, the path to JupyterLite is:
4. Ensure JupyterLite is Built
Make sure JupyterLite is built with your notebooks:
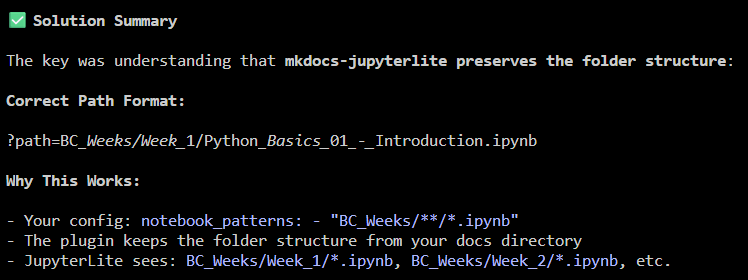
Check that mkdocs.yml has the jupyterlite plugin enabled with correct patterns:
Available JupyterLite Interfaces
Your JupyterLite build includes multiple interfaces:
| Interface | URL | Use Case |
|---|---|---|
| Lab | /jupyterlite/lab/ |
Full JupyterLab with file browser, terminal, etc. |
| Notebooks | /jupyterlite/notebooks/ |
Simplified notebook-only interface |
| Tree | /jupyterlite/tree/ |
File browser view |
| REPL | /jupyterlite/repl/ |
Python console only |
For embedding, try /notebooks/ instead of /lab/ - it's simpler and less cluttered.
FAQ
Q: Can I hide JupyterLite's navigation when embedded? A: Not easily. JupyterLite is a full app and its UI is integral to its functionality.
Q: Why not just use mkdocs-jupyter and make everything static? A: You can! It's simpler and provides better MkDocs integration, but notebooks won't be interactive.
Q: Can users' work be saved when using JupyterLite? A: Yes, JupyterLite saves to browser local storage. Work persists across sessions (unless browser data is cleared).
Q: Which interface should I use for embedding?
A: Try /notebooks/ first - it's simpler than /lab/. But direct links (no embedding) might be cleaner.
Q: How do I reset notebooks to their original state? A: Users need to clear browser localStorage/IndexedDB for your site, or use JupyterLite's file menu to reset individual notebooks.
Next Steps
- Visit the Test Embedding page to see different approaches in action
- Choose the approach that best fits your needs
- Update your Week index pages accordingly